You’ve got a photo of your handwriting, a stack of thank-you cards due before the weekend, and the vague hope that some tool online can turn those letters into an actual installable font. That’s the promise behind every image to font generator, and the part nobody tells you is that the tool’s brand name matters far less than which conversion method it runs underneath. Real people pay for this exact service (handwriting-to-font conversion is literally sold as a gig on Etsy), so let’s figure out what’s happening to your image under the hood.
Key Takeaways
An image to font generator produces a glyph-mapped TTF or OTF file; if a tool can’t export those, it’s a text styler, not a font generator.
Quality dies at three predictable points: bad scan thresholding, misassigned glyph cells, and auto-generated spacing with no kerning pairs.
The three conversion pipelines are OCR glyph recognition, vector tracing, and AI/ML character-set extrapolation, and each preserves different things.
Table of Contents
What an image to font generator actually produces
Put simply, an image to font generator takes a picture of lettering and turns it into an installable font file, with each glyph assigned to its character slot. You end up with a real font, not a picture of styled text. A real file you can install and type with in any app.
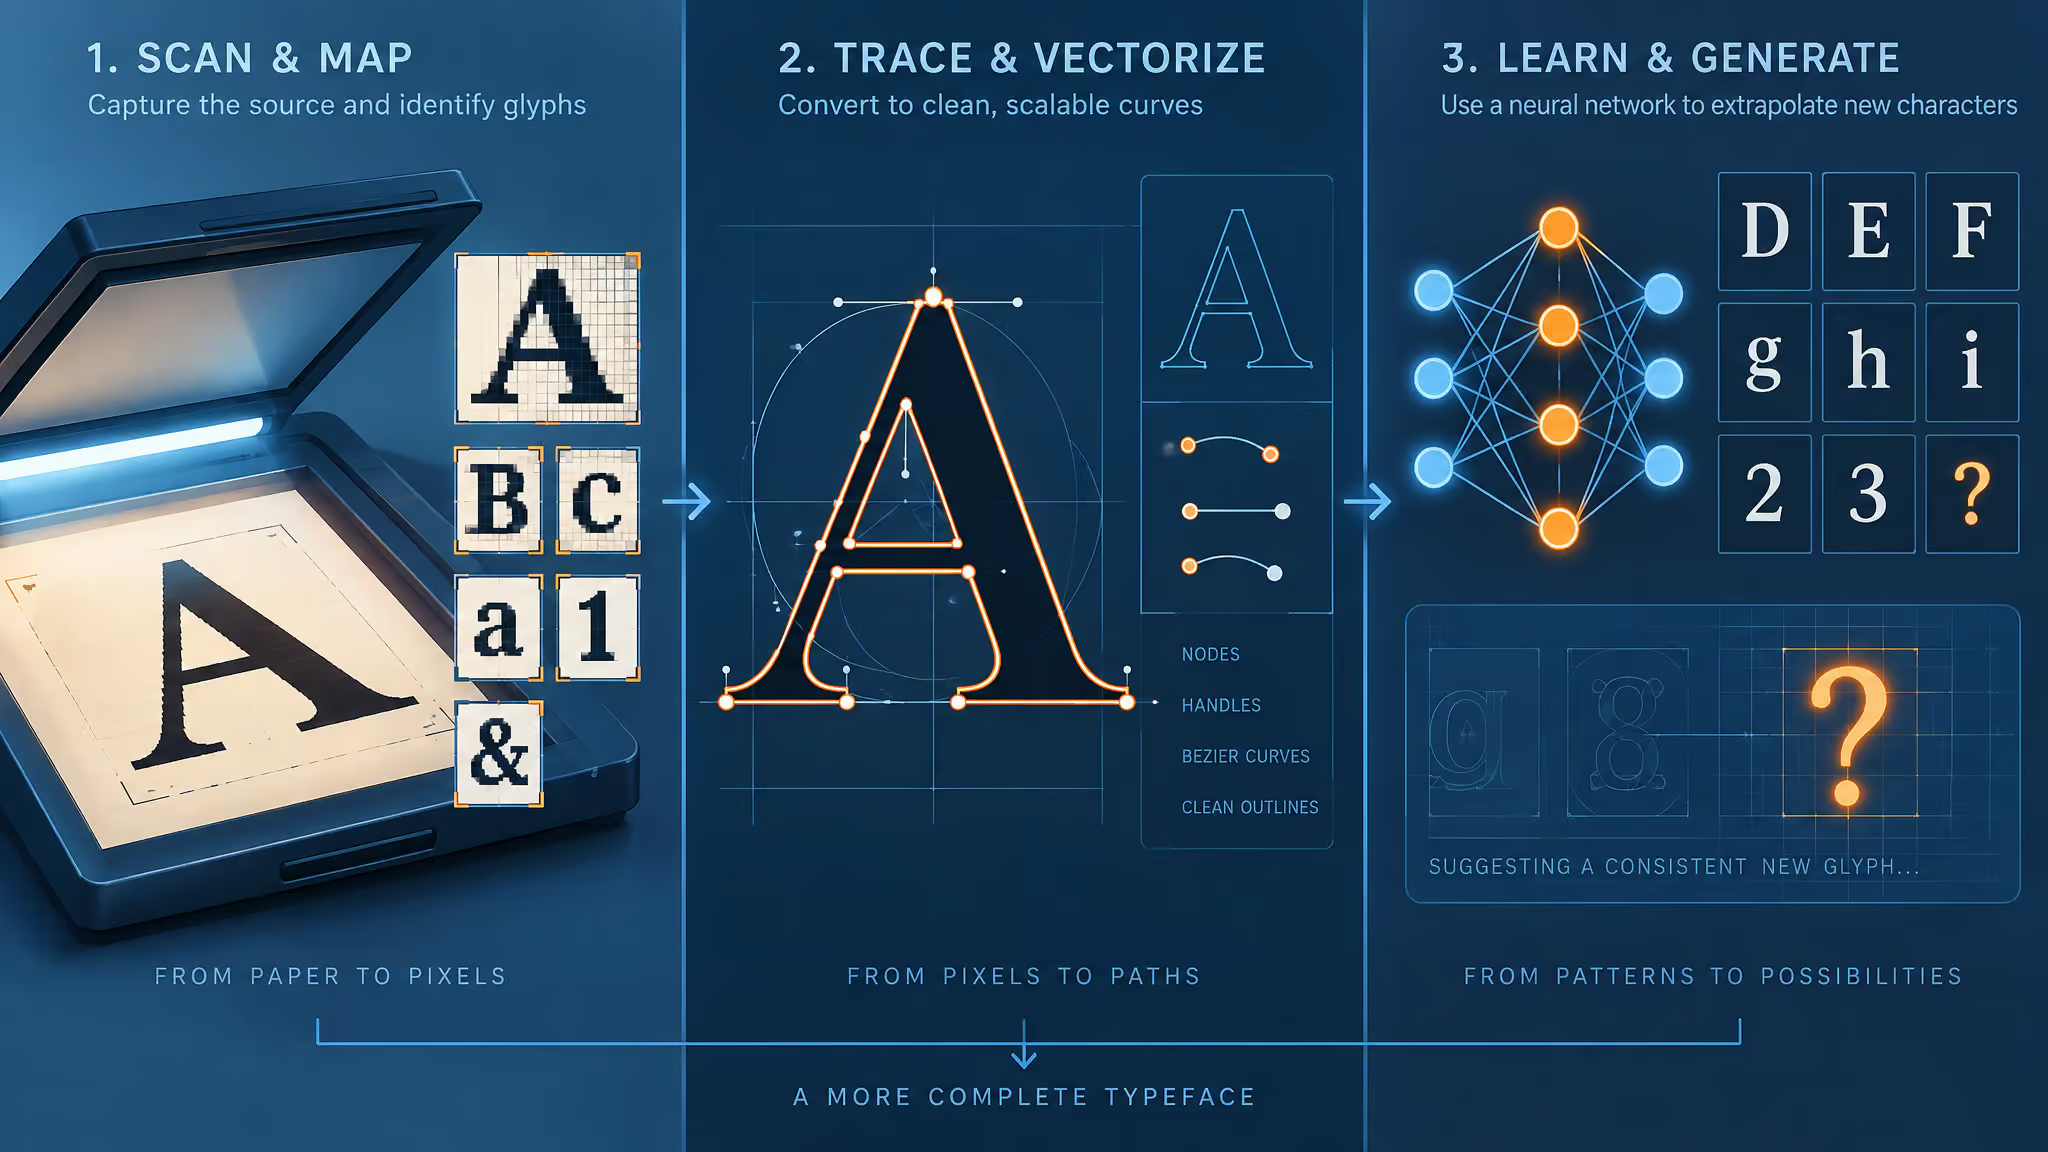
The pipeline is straightforward: you upload your image, the tool analyzes it to find individual letterforms, maps each one to its character slot (this A goes in the A slot, that B in the B slot), generates the character set, and exports a font file, typically TTF or OTF, with WOFF as an option for web use. That’s the whole trick, and it’s honestly kind of elegant.
The contrast that matters: text-styler services only render images of text. They look like font generators and produce nothing installable. So check whether the tool actually exports TTF or OTF. If it doesn’t, close the tab.
Image to font vs image to text: which one do you actually need?
OCR extracts the words from an image; a font generator recreates the letterforms as a typeface. That’s the entire distinction, and the routing rule is one line: if you want the words, use OCR; if you want the letterforms, use a font generator.
The confusion is measurable. “Image to text converter free” pulls roughly 1,300 searches a month, while “image to font converter” gets about 50 at a $10.95 CPC, which means a large, confused adjacent audience keeps landing on OCR tools when they wanted a typeface, and vice versa. If you’re trying to digitize meeting notes from a whiteboard photo, OCR is your tool. If you’re trying to make your handwriting typeable in a birthday card, it’s not.
How to convert an image to a font, step by step
The usual route is a template-and-scan workflow: download the template, fill every character cell, scan it in high-contrast black ink on white paper, upload it, let the tool map the glyphs, and export your TTF or OTF. Simple in outline, but each step has a specific place where quality leaks out, and knowing those points is the difference between a font you’ll use and one you’ll delete.
Prepare the image
This is where most results die. Uneven lighting across your scan means the thresholding step (binarization, where the tool decides which pixels are ink and which are paper) makes inconsistent calls. One letter comes out bold and blobby, the next thin and broken. Bad thresholding wrecks everything downstream, and no amount of clever software fixes a bad binarization. Shoot or scan flat, evenly lit, black ink on white paper, high contrast. Boring advice, but it’s boring because it’s the load-bearing step.
Upload and glyph mapping
Once uploaded, the tool analyzes each cell and assigns it to a character slot. Auto-mapping, like most automated approaches to generating fonts, AI included, is good but not perfect: it can misassign a cell (your sloppy ampersand becomes a weird 8) or skip cells entirely, leaving characters missing from your font. Check the preview grid before you export. Every unmapped cell is a character that will render as a fallback font in real use, which looks exactly as bad as it sounds.
Also worth knowing as a structural limit: you get single-weight glyphs. Your font has one weight, period, because the sample only had one weight.
Export and install
Export as TTF (or OTF), install it, and type something real. Here’s the classic failure pattern: the font looks fine for the letters you sampled, but in actual sentences it reads robotic, because the spacing was auto-generated with no kerning pairs. The tell is even, mechanical gaps between letters that were naturally connected in your handwriting. Handwriting flows; auto-spaced glyphs march. If your result has that problem, you now know it’s a spacing loss point, not a broken tool, and you can look for a tool or workflow that lets you adjust kerning before blaming the algorithm.
Quick test: Before uploading anything, confirm the tool exports TTF or OTF files. No font-file export means no installable font, no matter how good the preview looks.
That’s the diagnostic habit: when a result disappoints, check the three loss points (input thresholding, glyph mapping, spacing) instead of assuming the tool is garbage. Usually it’s one of the three.
Three conversion methods: OCR vs vector tracing vs AI/ML
The three ways to convert an image to a font are OCR-based glyph recognition, vector tracing, and AI/ML character-set extrapolation, not to be confused with copy and paste font generators, which merely restyle existing Unicode characters, and whichever pipeline a tool runs underneath tells you a lot about the quality you can expect before you upload anything.
- OCR glyph recognition: maps scanned characters to font slots. Fast, and exactly as faithful as your sample, no more.
- Vector tracing: converts bitmap letterforms into bezier curves. The whole result hinges on input binarization: a clean scan traces cleanly, a muddy one produces jagged curves.
- AI/ML extrapolation: tools like Mixfont, GLIPH, YoFont, and Lipi.ai analyze weight, curves, and contrast to extrapolate a full character set from a partial sample. Mixfont, for example, builds a complete 320+ glyph TTF from a single reference image, which is genuinely wild if you’ve ever hand-drawn a glyph set.
Full disclosure on my end: the comparison I want to run is all three pipelines on the same real handwriting samples, judged on letterform fidelity, curve cleanliness, and weight consistency. I haven’t run it yet, so treat those three criteria as the plan, not as results. When I do, those are the numbers that matter, not marketing pages.
Tool comparison: what each approach preserves and what it can’t do
The free routes are Calligraphr for template-based handwriting conversion and FontForge for manual vector design. Calligraphr automates the work, FontForge gives you full control. Here’s how the three approaches compare on what they preserve:
| Template-based (Calligraphr-style) | Manual vector design (FontForge) | AI-based generators | |
|---|---|---|---|
| Letterform fidelity | Yes (as good as your scan) | Yes (full control) | Partial (extrapolated from samples, see whether AI can generate fonts) |
| Curve quality | Partial (depends on binarization) | Yes (hand-drawn beziers) | Partial (model-dependent) |
| Weight consistency | No (single weight from sample) | Yes (you design each weight) | Partial (inferred, can drift) |
| Full character set | No (limited by template glyphs) | Yes | Yes (e.g. Mixfont’s 320+ glyphs) |
| Free tier | Yes (with glyph limits) | Yes (fully free, open source) | Partial (varies by tool) |
| TTF/OTF export | Yes | Yes | Yes |
On the free-versus-paid and glyph-limits front: template tools typically cap how many glyphs the free tier includes, with paid tiers unlocking more, while FontForge gives you everything with no cap and a much steeper learning curve. AI generators are the wildcard: limits and export formats differ from tool to tool, so check the specs before you scan in a big sample.
One crossover worth knowing from the AI image ecosystem: per VEED‘s model comparison, Ideogram is the strongest model for typography, and Recraft V3 outputs scalable vector files that stay crisp at billboard size. That last part is the killer detail for font-adjacent work, because resolution-independent output is exactly what type people care about. But be precise about what these are: cleanup and vectorization inputs for a font workflow, not font-file creators. You’d use Recraft to get clean vector lettering, then bring it into a real font tool.
And the composite setup mistake I keep seeing: someone photographs lettering with a phone under uneven lighting, runs autotrace, gets jagged curves, and blames the tool. The bottleneck is the input threshold, not the algorithm. Fix the lighting and the contrast, and most autotracers suddenly look competent.
Can ChatGPT create or identify a font?
No. ChatGPT can identify or approximate fonts and generate images containing lettering, but it won’t hand you installable TTF or OTF files. Image generation with text is not font-file creation, and that boundary is hard.
CNET‘s testing found that text inside ChatGPT-generated images is inconsistent, which tracks with what the model is actually doing: painting pixels that resemble letters, not building glyphs. On the privacy side, you can turn off model training for your account, which matters if you’re uploading samples of your handwriting.
The constructive reroute: ChatGPT’s best role in a font workflow is an intermediate cleanup or vectorization step before tracing, paired with a tool that actually exports font files. It’s the convenient default everyone already has, and it’s genuinely useful, as long as you don’t ask it to do the one thing it can’t.
What happens to your handwriting when you upload it
Your handwriting is biometric-adjacent personal data (it’s on your signatures, your checks, your notes), so read the training and privacy policy before uploading. The policies vary a lot: Adobe keeps user content out of its training; Canva keeps generated images private and stays out of training on user content; Gemini’s policy permits using user info to improve its AI products; Midjourney makes images public by default, with privacy only through stealth mode on a paid plan. And if you’re hesitating, that’s fair, you upload your filled template and only then wonder whether it’s actually stored or feeding a model. Check first, upload second.
Red flag: If a service’s policy says user content may improve its AI products, assume your handwriting samples could end up in training data.
Can you own and sell a font made from your handwriting?
It depends on how the font was made. Per CNET’s FAQ, AI-edited content may receive copyright protection when the AI involvement is disclosed, while content generated entirely by AI likely lacks protection. That’s hedged because the law is hedged, and none of this is jurisdiction-specific legal advice.
The context is genuinely unsettled: Disney, Universal, and Warner Bros. are suing Midjourney over copyright infringement from AI-generated recognizable characters, and Ziff Davis, PCMag‘s parent company, filed suit against OpenAI in April 2025. No outcomes yet, so no speculation, just an active legal frontier.
Then there’s the separate question people conflate with it: tracing a typeface you found online raises font licensing questions that are entirely different from AI-generation questions. When the font comes from your own handwriting, ownership is about as clean a case as you’ll find. A traced typeface carries licensing risk, because someone else may own the design you just digitized.
Choosing the right method for your project
Trace from an image when you need speed and the sample is clean; design from scratch in FontForge when automated tracing quality falls short and you need control. Everything else follows from that.
Handwriting fonts: go template or AI route, then check the kerning before you ship it. Logo lettering: vector tracing or AI extrapolation, where Recraft’s billboard-crisp vector output earns its keep as an intermediate step. Full typefaces: FontForge from scratch, no shortcuts. One-off projects: fastest route, nobody’s grading you.
One operational gotcha worth planning for: if you’re converting a specific employee’s handwriting for business use, staff turnover makes that font useless the day they leave. Convert the handwriting of whoever will actually be doing the writing long-term.
Across all of these, kerning and spacing quality is the deciding criterion, because that’s where converted fonts fail in the wild. Method and input preparation, not the brand on the button, determine what you get.
Frequently Asked Questions
How can I convert an image to a font?
The usual route is a template-and-scan workflow: download the tool’s template, fill every character cell in high-contrast black ink on white paper, scan it flat and evenly lit, upload it, check the glyph mapping preview, and export a TTF or OTF file. Quality leaks at three predictable points — scan thresholding, glyph mapping, and auto-generated spacing — so fix your lighting and check the preview grid before blaming the tool.
Can chatgpt identify font?
It can identify or approximate fonts, but that’s a different job from creating one. Even when it names a font correctly, you still don’t get an installable file — and testing has found text inside ChatGPT-generated images is inconsistent, because the model paints pixels that resemble letters rather than building glyphs.
How to make a font from pictures?
Upload a clean, high-contrast image of your lettering to a tool that exports TTF or OTF files, let it map each letterform to its character slot, verify the preview grid for misassigned or skipped cells, then export and install. If the tool can’t export a font file, it’s a text styler, not a font generator — close the tab.
What is an image to font generator and how does it work?
It takes a picture of lettering and turns it into an installable font file, with each glyph assigned to its character slot — a real font you can type with in any app, not a picture of styled text. The pipeline: upload the image, the tool finds individual letterforms and maps them to character slots, generates the character set, and exports TTF or OTF (with WOFF as a web option).
What is the best free tool to create a font from image files?
Calligraphr is the free route for template-based handwriting conversion, and FontForge is fully free and open source for manual vector design with no glyph caps. Template tools typically limit how many glyphs the free tier includes, while FontForge gives you everything at the cost of a much steeper learning curve.
How do I use an image to font converter to make my handwriting into a font?
Use a template-based tool: fill in every character cell on the downloaded template with black ink on white paper, scan it flat and evenly lit, upload, and check the glyph mapping before exporting. Your font will have a single weight because your sample only had one, and expect to adjust kerning — auto-generated spacing makes handwriting read robotic, with even mechanical gaps where letters naturally connected.
What are the limitations of turning a photo of text into a working font?
Three main ones: bad scan thresholding produces letters that are bold and blobby or thin and broken, auto glyph mapping can misassign or skip cells, and auto-generated spacing with no kerning pairs makes sentences read robotic. You also get single-weight glyphs only, since the sample only had one weight.
