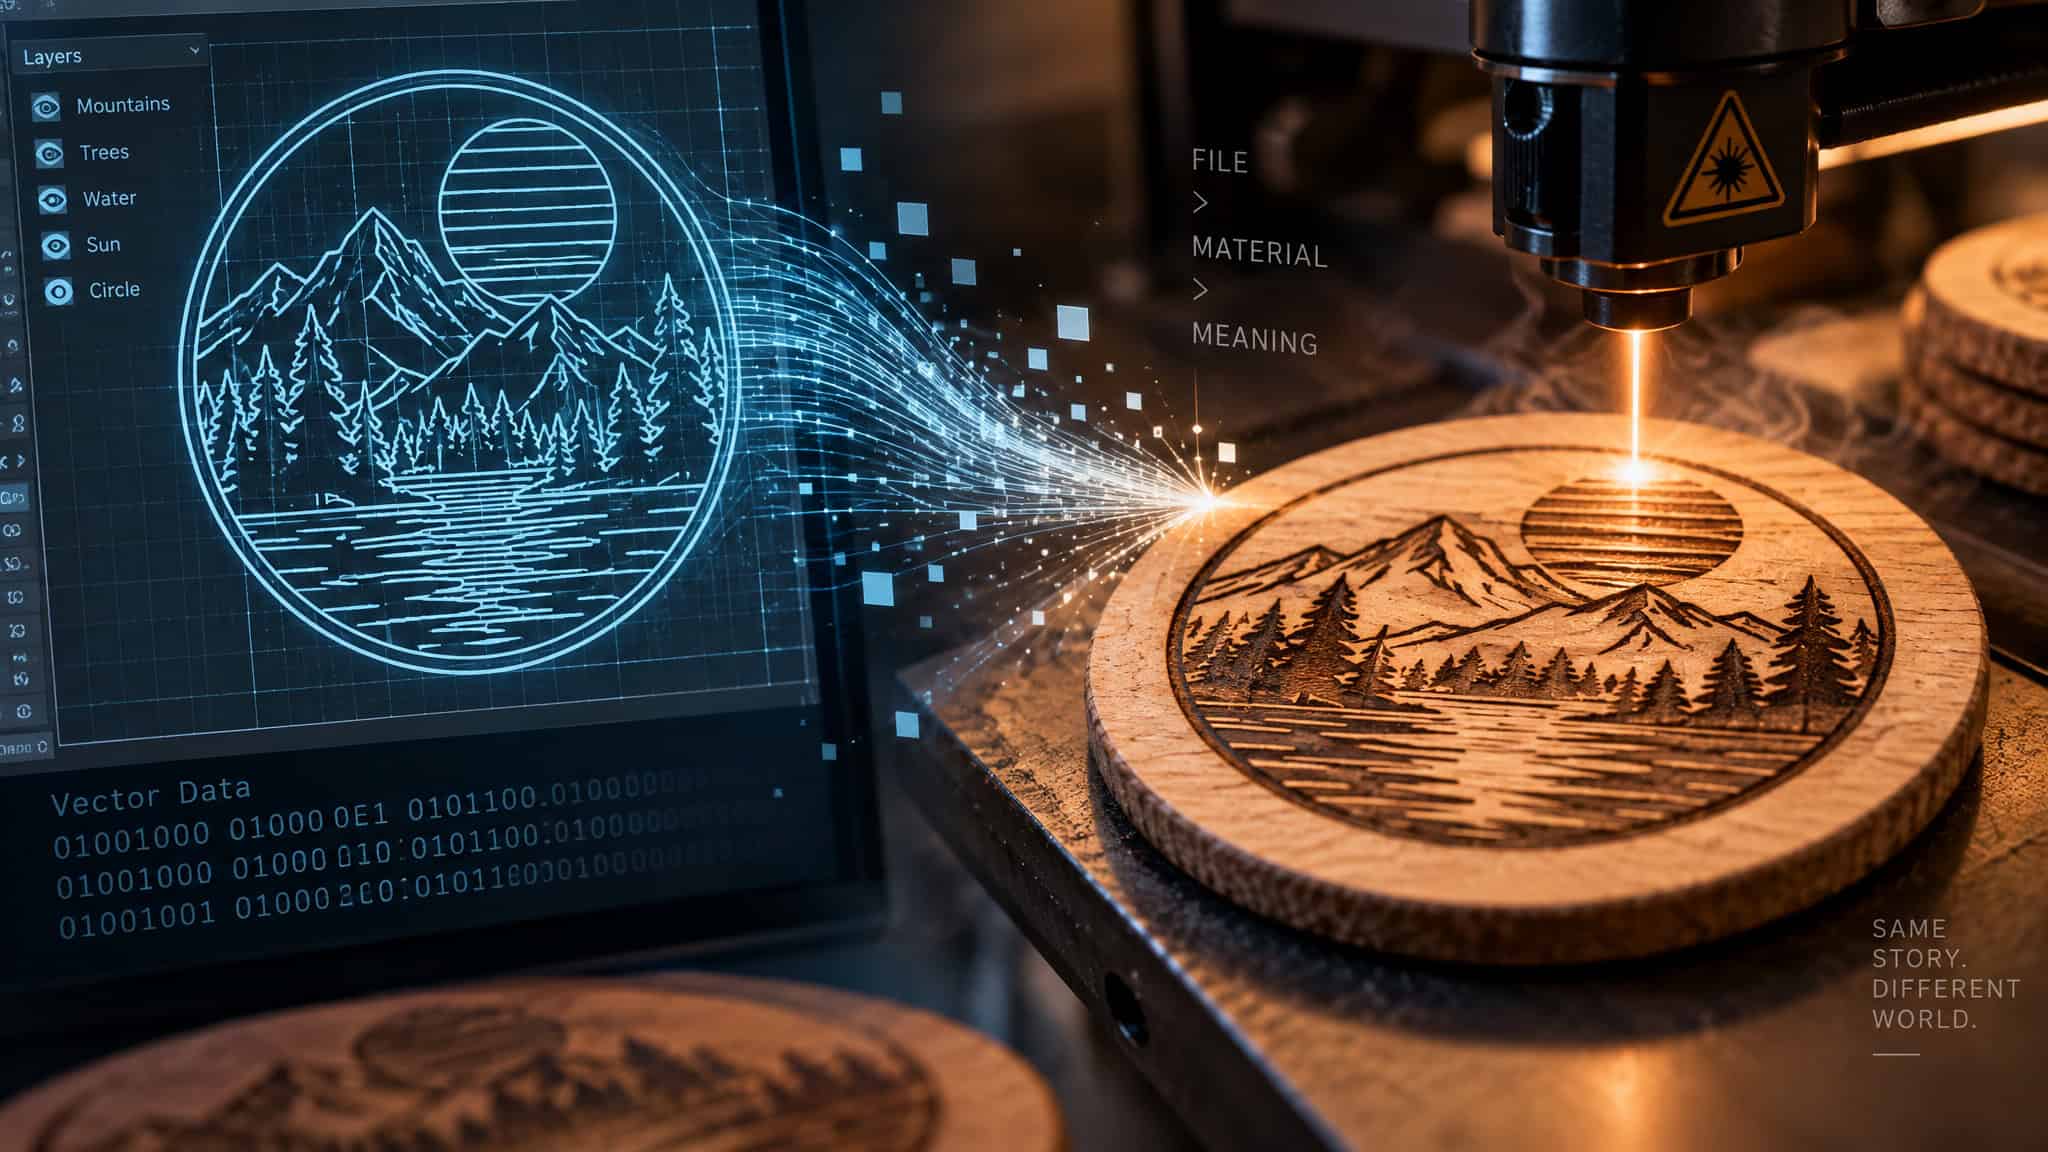
A coaster file can look razor-sharp on a monitor and still burn like a scorched waffle the second the laser fires, because the failure happens in the file prep rather than at the laser head: pixelated bitmaps, unexpanded font references, unremoved white fills, and modern export formats that control software misreads. Laser engraving has crossed over from industrial floors to DIYers, small craft businesses making personalized wedding or birthday gifts (per TechJunkie), and secondary schools like the IGS Regine Hildebrandt center in Magdeburg, Germany (per Foro3D), where students swapped analog overhead projectors for compact laser engravers alongside 3D plotters and digital embroidery machines to run vector files and real cutting parameters through raster rescue, vectorization, typography expansion, legacy export, material selection, machine matching, and test burns.
Key Takeaways
Upscale low-resolution 96 dpi artwork to 600 dpi in Adobe Photoshop using Preserve Details 2.0 resampling and a Threshold adjustment around 184 before running Image Trace in Adobe Illustrator.
Expand live traces and typography via Object > Expand, delete all white fills so laser software reads them as empty background rather than hatched burn shapes, and export in legacy Illustrator version 8, EPS, or DXF formats.
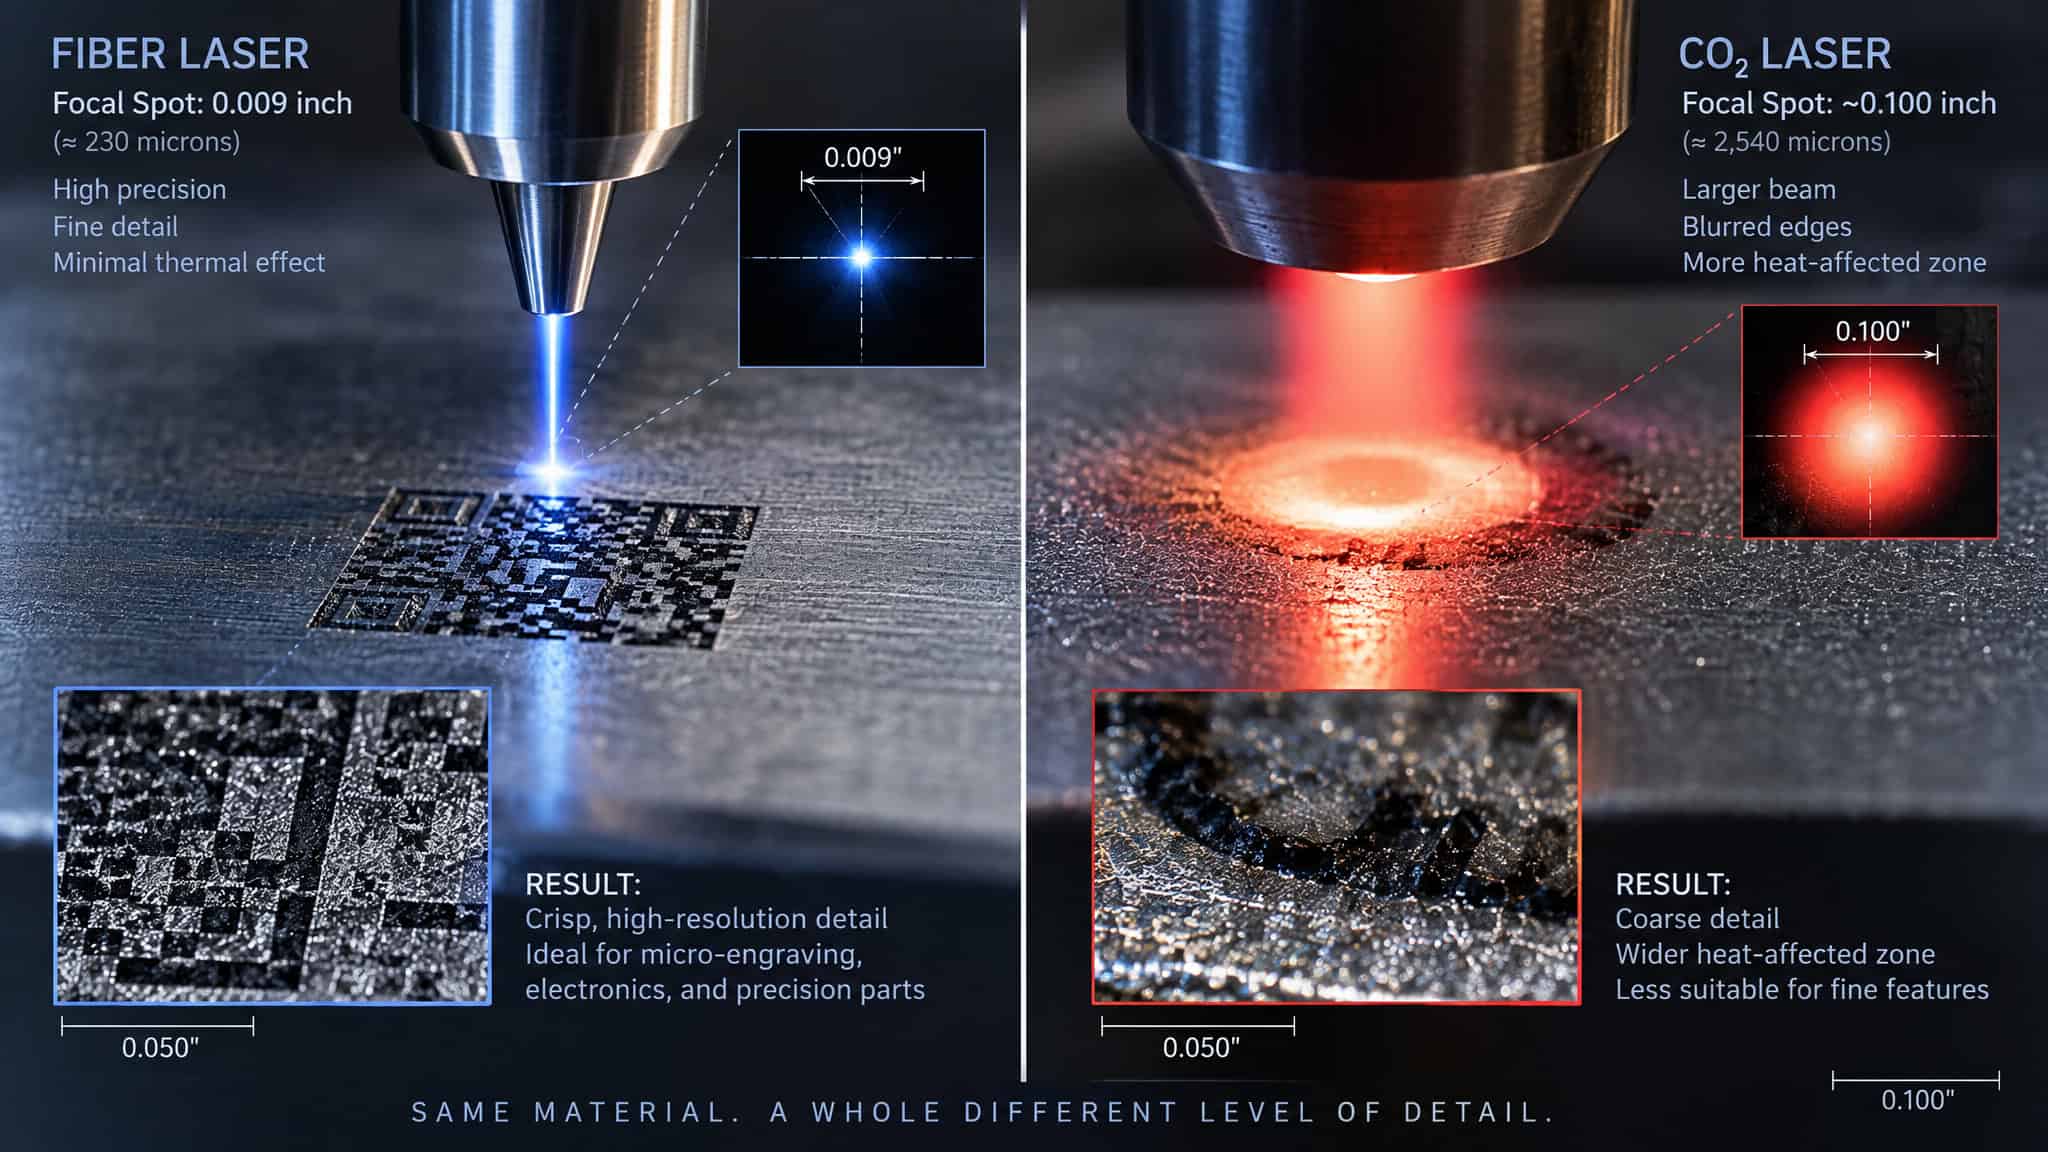
Fine coaster surface detail depends on optical spot size rather than raw cutting wattage, allowing a 0.009-inch focus Atomstack Pro or a 1.6W Laserpecker Mini to outperform a 40W+ CO2 laser on intricate 4-inch artwork.
Table of Contents
Vector or raster: how the laser physically sees your coaster file
For laser engraving coasters, you should use a clean vector file (such as an SVG or EPS) rather than a raster file whenever possible. Across the full coaster production workflow, from file preparation and material selection to test burns and machine settings, almost all laser control software prefers clean vector files. Vector engraving drives the laser along mathematical paths to inscribe crisp logos, circular seals, and score lines (or execute precise subtractive cutting), whereas raster (grid) engraving is reserved for photographs and shaded gradients where the laser advances horizontally line by line to remove specific material thicknesses and form a contrasted picture. If you convert bitmap art into vectors using Adobe Illustrator’s Image Trace (or build paths in free tools like Inkscape), vector cleanup is essential: you must expand the trace, clean up messy geometry, and delete every white fill so your laser software reads white areas as empty background rather than shapes to hatch and burn.
Under the hood, the machine executes two completely different physical routines depending on the file data you feed it. When you send vector paths, the gantry follows continuous X-Y coordinates like a plotter. That path-following precision is what separates laser cutters from surface engravers: cutters practice subtractive manufacturing, following vector outlines to cleanly slice through large sections of wood, plastics, and acrylics (even entry-level cutters routinely run CO2 laser tubes to handle this). Engravers use those same mathematical paths to score crisp outlines or fill closed vector shapes on top of the surface.
Feed the machine a bitmap, and it switches into grid engraving. Instead of tracing outlines, the laser head sweeps back and forth horizontally like an inkjet printer, firing pulses to ablate specific thicknesses of material until a contrasted, legible picture emerges on the coaster face. In this horizontal sweep mode, optical physics matters more than raw tube power: a shorter focal length paired with a smaller spot size produces noticeably tighter accuracy.
When you pull stock assets from Adobe Stock or Vecteezy (searching terms like “laser cut files,” “mandala SVG,” “geometric patterns,” or “monogram frames”) or draft custom monograms, family crests, inside jokes, and wedding dates from scratch, sort elements by how the beam physically behaves:
- Keep in vector format (EPS, SVG, DXF, AI): Line art logos, text rings, monogram frames, geometric patterns, outer cut lines, and stamp-style seals where edges must stay razor-sharp at any scale.
- Keep in raster format (high-dpi PNG): Photographs and complex shaded gradients that rely on continuous tonal variation. Forcing a shaded photo through vector tracing turns smooth gradients into jagged topological blobs that scorch the coaster.
Rescuing low-resolution artwork in Photoshop before it hits the trace
600 dpi is the target image resolution required in Adobe Photoshop to rescue low-resolution bitmap artwork before converting it into laser-ready vector paths. Customer-submitted files and salvaged internet graphics typically arrive pixelated around 96 dpi, and dragging them straight into Illustrator produces jagged, unusable vectors; protecting your project turnaround (and your income if you’re running a small laser engraving business) requires upscaling in Photoshop with Preserve Details 2.0 resampling and isolating true black tones with a Threshold adjustment before saving a clean PNG for Image Trace. In the laser art-prep tutorials by Alex at Laser Everything, a customer’s low-resolution goblin picture submitted for a wooden dungeon master screen board went through this exact 600 dpi and Threshold rescue pipeline to become a crisp vector engraving on wood.
Once the file’s upscaled to 600 dpi with Preserve Details 2.0 handling the edge interpolation, apply Image > Adjustments > Threshold. Threshold strips out every gray midtone and drops anything that isn’t true black, leaving pure solid black-and-white contrast for the tracer. In the goblin board walkthrough, the Threshold slider sat right around 184. That slider is a live judgment call: push it too far in one direction and fine linework washes out completely; push it too far the other way and shadows muddy into black blobs.
Save the cleaned black-and-white raster as a PNG (or save directly over the working file) before moving to Illustrator. Mostly black-and-white images trace cleanly right out of this pipeline, whereas multi-colored source images react unpredictably to tonal thresholds and need extra manual tweaking to separate.
Vectorizing in Illustrator: Image Trace is the easy 10 percent
Image Trace is Adobe Illustrator’s raster-to-vector conversion engine that turns a cleaned 600 dpi PNG into mathematical art, which must then be finalized via Object > Expand into editable paths laser software can actually read. Because initial auto-traces routinely leave behind complex overlapping geometry and hidden white shapes that laser software misinterprets as areas to hatch and burn, every trace requires a strict post-expansion cleanup ritual: ungrouping the artwork, selecting and deleting all white fills via Select Same > Fill Color, merging stray geometry with the Shape Builder tool, and regrouping the design into a single movable piece.
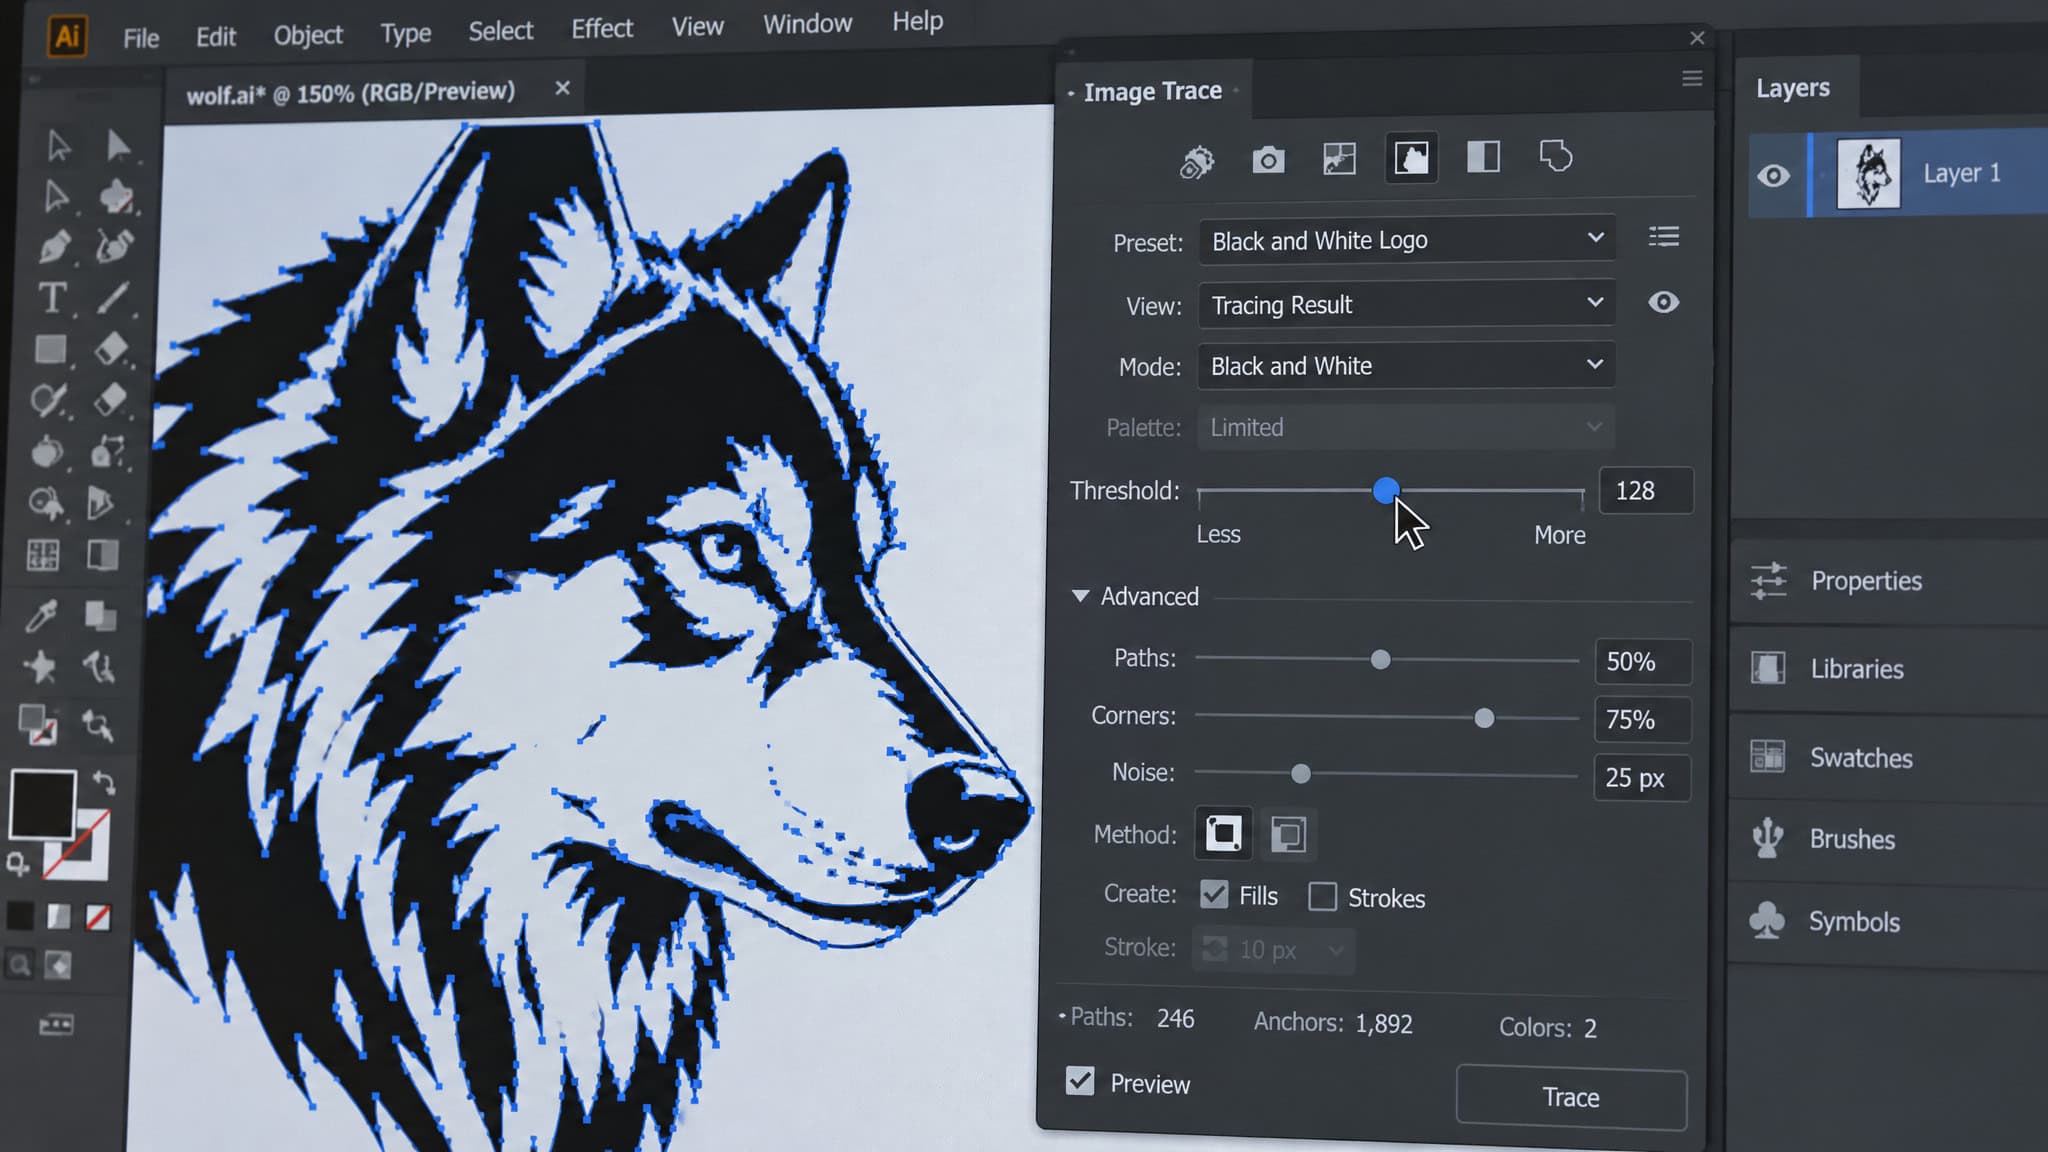
Image Trace settings that survive a laser
Drop your cleaned PNG onto the Illustrator artboard, select it, and open the Image Trace panel. The default black-and-white logo preset handles most line art immediately. If fine strokes vanish on the first pass, nudge the trace panel’s threshold slider to recover lost lines, and flip the preview dropdown to “Outline with Source Image” to sanity-check how closely your new vector paths hug the original bitmap. While the trace panel includes an “Ignore White” checkbox, Image Trace often chokes on transparency; flattening transparent PNGs onto a solid white background layer before tracing keeps outer graphic edges clean.
Expand, then delete the white: the cleanup ritual
A live trace object’s still a dynamic preview until you run Object > Expand with both Object and Fill checked. Once the anchor points appear, strip out the white fills. Laser control software reads empty artboard as background, not white vector shapes. Leave white fills inside a coaster seal and the laser will dutifully hatch and burn the negative space. Ungroup the expanded art, click a white area, run Select > Same > Fill Color, hit delete, and regroup the remaining black paths so the artwork moves as one locked unit.
Shape Builder and Pathfinder for messy geometry
Auto-tracing leaves stray anchor knots and overlapping segments that cause a laser head to stutter or double-burn a corner. Grab the Shape Builder tool (or use Pathfinder operations) to drag across adjacent vector sections, combining fractured islands or subtracting unwanted interior shards before export.
Typography that survives the laser: expanding text and building circular seals
Adding circular text or a badge seal to a coaster in Adobe Illustrator requires building the ring with the Type on a Path tool and converting every live font reference into physical vector shapes via Object > Expand before exporting to the laser. Even when you bend lettering into arcs or banners using Object > Envelope Distort > Make with Warp (such as Arc, Arch, or Flag effects), the resulting warp framework must be expanded a second time via Object > Expand so fiber and CO2 laser software can read the paths.
Why unexpanded text breaks at the machine
If you see an underline beneath your lettering on the Illustrator artboard or in the layers panel, that text’s still a live system font reference. To a laser controller, live font vectors are completely invisible. Selecting the text and running Object > Expand converts the typography into closed geometric outlines that burn just like any other shape.
Type on a Path for circular seal layouts
A University of Rochester honorary-society plaque layout, complete with a circular seal, nested text rings, and outer mounting holes, shows how to keep curved coaster text right-side-up:
- Draw a circle with the Ellipse tool, set the fill to none, and apply a simple stroke so you can see the path.
- Select the Type on a Path tool, click the circle, and set paragraph alignment to center so the text handle snaps cleanly to the top center node.
- To add a bottom text ring that doesn’t read upside down, Alt-drag the top text path to duplicate it, flip the drag handle to the inside of the circle, and nudge the circle diameters until both top and bottom rings align visually.
For textured backgrounds, the Area Type tool fills any closed shape with repeated text patterns. You can also invert a circular layout so the laser engraves the entire surrounding circle while leaving the expanded lettering untouched, creating a raised stamp-style coaster face.
The save dialog decides whether your design survives
Exporting final coaster vectors as Adobe Illustrator version 8, EPS, or DXF is the mandatory compatibility step that prevents laser control software from rejecting the file or burning white background areas as solid hatched shapes. Modern CS5 and CS6 .ai files routinely fail to import into laser software at all, so match the legacy export format to your controller: DXF (alongside SVG or 300 dpi grayscale PNGs for raster jobs) for LightBurn, and legacy Illustrator 8 or EPS files for EasyCad-style workflows. That keeps your path geometry and background transparency clean.
It’s a classic maker-bench trap: you spend an hour perfecting anchor points and kerning a circular seal, hit Ctrl+S with modern defaults, and watch the file choke at the machine. At GeekExtreme, we love when a 25-year-old file specification solves a modern hardware headache, and selecting “Illustrator 8” in the legacy save dropdown does exactly that. It strips out modern compression and appearance wrappers that confuse laser parsers, guaranteeing that unburned negative space reads as background rather than a hatched fill pass. Export both an Illustrator 8/EPS file and a backup DXF into your project folder so a picky import parser never stalls a batch run.
Coaster materials: the compatibility matrix, and the one plastic to never engrave
Wood, bamboo, and laser-safe acrylic are the most reliable everyday coaster materials for clean engraving and cutting, whereas polycarbonate must never go under a laser because it melts, ruins the workpiece, and emits harmful gases. Across the coaster substrate palette, natural slate and stone engrave with crisp contrast once pre-cleaned (though slate’s layered texture swallows tiny details and requires per-piece digital caliper focus measurements before sealing and finishing the engraved surface), leather and glass etch cleanly for custom barware and accessories, and a 60W CO2 machine like the OMTech cuts plywood and acrylic blanks up to 1.4 inches thick.
| Material | Safe to Laser | Coaster Workflow Role & Constraints |
|---|---|---|
| Wood & Plywood | Yes | Cuts up to 1.4 in thick on OMTech 60W CO2; takes both vector scores and raster fills. |
| Bamboo | Yes | Engraves cleanly for coasters and intricate handicrafts. |
| Laser-Safe Acrylic | Yes | Cuts up to 1.4 in thick on OMTech 60W CO2; etches cleanly on the surface. |
| Stone & Slate | Yes (engrave only) | Requires pre-cleaning and per-piece caliper measurement; swallows tiny fine lines. |
| Glass | Yes (engrave only) | Surface-etches cleanly for drinkware and bar coasters. |
| Leather | Yes | Engraves and cuts cleanly (the same stock family used on wallets and shoes). |
| Jade & Ivory | Yes (engrave only) | Used for intricate jewelry and specialty handicraft engraving. |
| Polycarbonate | No (toxic gas hazard) | Melts, ruins the piece, and releases harmful gases when lasered. |
What engraves well, what cuts
Material selection dictates both your artwork rules and your workshop prep before the laser ever fires:
- Stone and slate blanks: On the pricing ladder, rock coaster sets are the cheapest blanks, blank slate sheets cost the most per piece, and soapstone cubes sit in the middle. Always scrub stone surfaces clean before engraving. Because natural slate varies in thickness from blank to blank, measure every single coaster with a digital caliper and feed that exact millimeter reading into your software’s autofocus, focus block, or manual Z-axis adjustment. Skip ultra-fine filigree on slate; its natural layers and flaky texture swallow delicate lines.
- Wood, bamboo, leather, and glass: These substrates carry fine vector seals and raster graphics without flaking, and mastering vector prep on wooden coasters transfers directly to engraving leather wallets, shoes, glass, or even intricate jade and ivory handicrafts.
The polycarbonate trap
Not all clear plastic sheets sitting in a workshop bin are acrylic. Never put polycarbonate under a laser beam. Where cast or extruded acrylic vaporizes cleanly, polycarbonate absorbs infrared and diode wavelengths poorly, melting into a discolored mess, ruining the blank, and venting hazardous gases into your workspace.
Machine choice for coaster detail: why spot size beats wattage
A compact diode laser engraver is more than enough for coaster faces because surface detail depends on a tight focal spot size rather than raw cutting wattage, whereas a high-wattage CO2 laser like the OMTech 60W is built for batch throughput and cutting thick plywood or acrylic blanks up to 1.4 inches deep. Baseline settings for CO2 lasers (40W+) start at 25 times the laser head power of the 1.6-watt Laserpecker Mini, yet a fine-focus diode like the Atomstack Pro (with its 0.009-inch focus) or the 6 oz Laserpecker Mini can outperform a big cabinet CO2 laser when rendering intricate artwork on a 4-inch coaster.
The machine classes at a glance
For beginners choosing an entry-level engraver on a budget, the right compact machine depends on whether you need portable app control, classroom-grade metal/wood versatility, or light cutting:
- Ortur Laser Engraver: Fits detail-focused beginners; pairs a fast 32-bit motherboard and rotary-roller cylinder support with an ultra-fine focus head (up to 1.6W output) and easy installation.
- Atomstack Pro: Built for ultra-fine coaster patterns via a 0.009-inch laser focus, built-in cooling, and free one-year part replacements, though it ships without printed instructions.
- Makeblock Laser Engraver: The compact unit used in the Magdeburg school classroom; uses a dual laser to cut wood and acrylic and engrave wood or metal via app, USB, or offline control on steel wheels with adjustable height and fixed focus.
- Neje Laser Engraver: Fits cordless-workflow makers; runs offline via phone, iPad, or laptop app without Wi-Fi, cuts thicker wood and acrylic, and uses super-cooling technology with a silent fan to keep smoke low.
- Laserpecker Mini: A 6 oz portable unit with a 1.6W head that runs off a power bank via app control for small coaster-sized surfaces.
- OMTech 60W CO2: Production-tier cabinet machine with an automated 20×28-inch (3.8 sq ft) workbed for multi-coaster batches, bundled RDWorks V8 and CoreLaser software for Windows, USB and ethernet ports, a 2,000-hour service life, and a two-year warranty.
Buyer criteria and safety systems
Running a laser safely at home depends on combining built-in hardware protections with strict material discipline (never lasering gas-emitting polycarbonate). Look for active safety cutoffs: Ortur includes a protective cover that filters 97% of UV rays, overload disconnect, and a G-sensor that auto-stops the beam if the machine or coaster shifts; the Laserpecker Mini packs blue-light filter goggles, a password lock, and motion/overheat auto-stop warnings; the Neje includes safety goggles; and the Atomstack Pro uses an eye-protection shroud that eliminates goggles. Factor long-term ownership into your budget: well-maintained engravers last about eight years with easy-to-source replacement parts, but complex machines can require professional repairs, and higher power draw plus multi-material capability increase total cost beyond the sticker price.
Execution: power settings, test burns, and diagnosing a messy coaster
Dialing in power and speed settings for coasters, and fixing burns that come out messy, scorched, or misaligned, requires running a sacrificial test grid on scrap material first and tracing artwork failures back through four upstream file-prep steps before blaming the hardware. Because natural materials vary so much that two rows burned at identical speed and power can look different, no single numeric recipe works blindly across wooden or stone coasters; a 5W-10W diode laser on slate might start around 3000 mm/min at 85% power while 40W+ CO2 lasers run much faster, so always pull baseline numbers matched to your exact laser module and verify them on a spare blank.
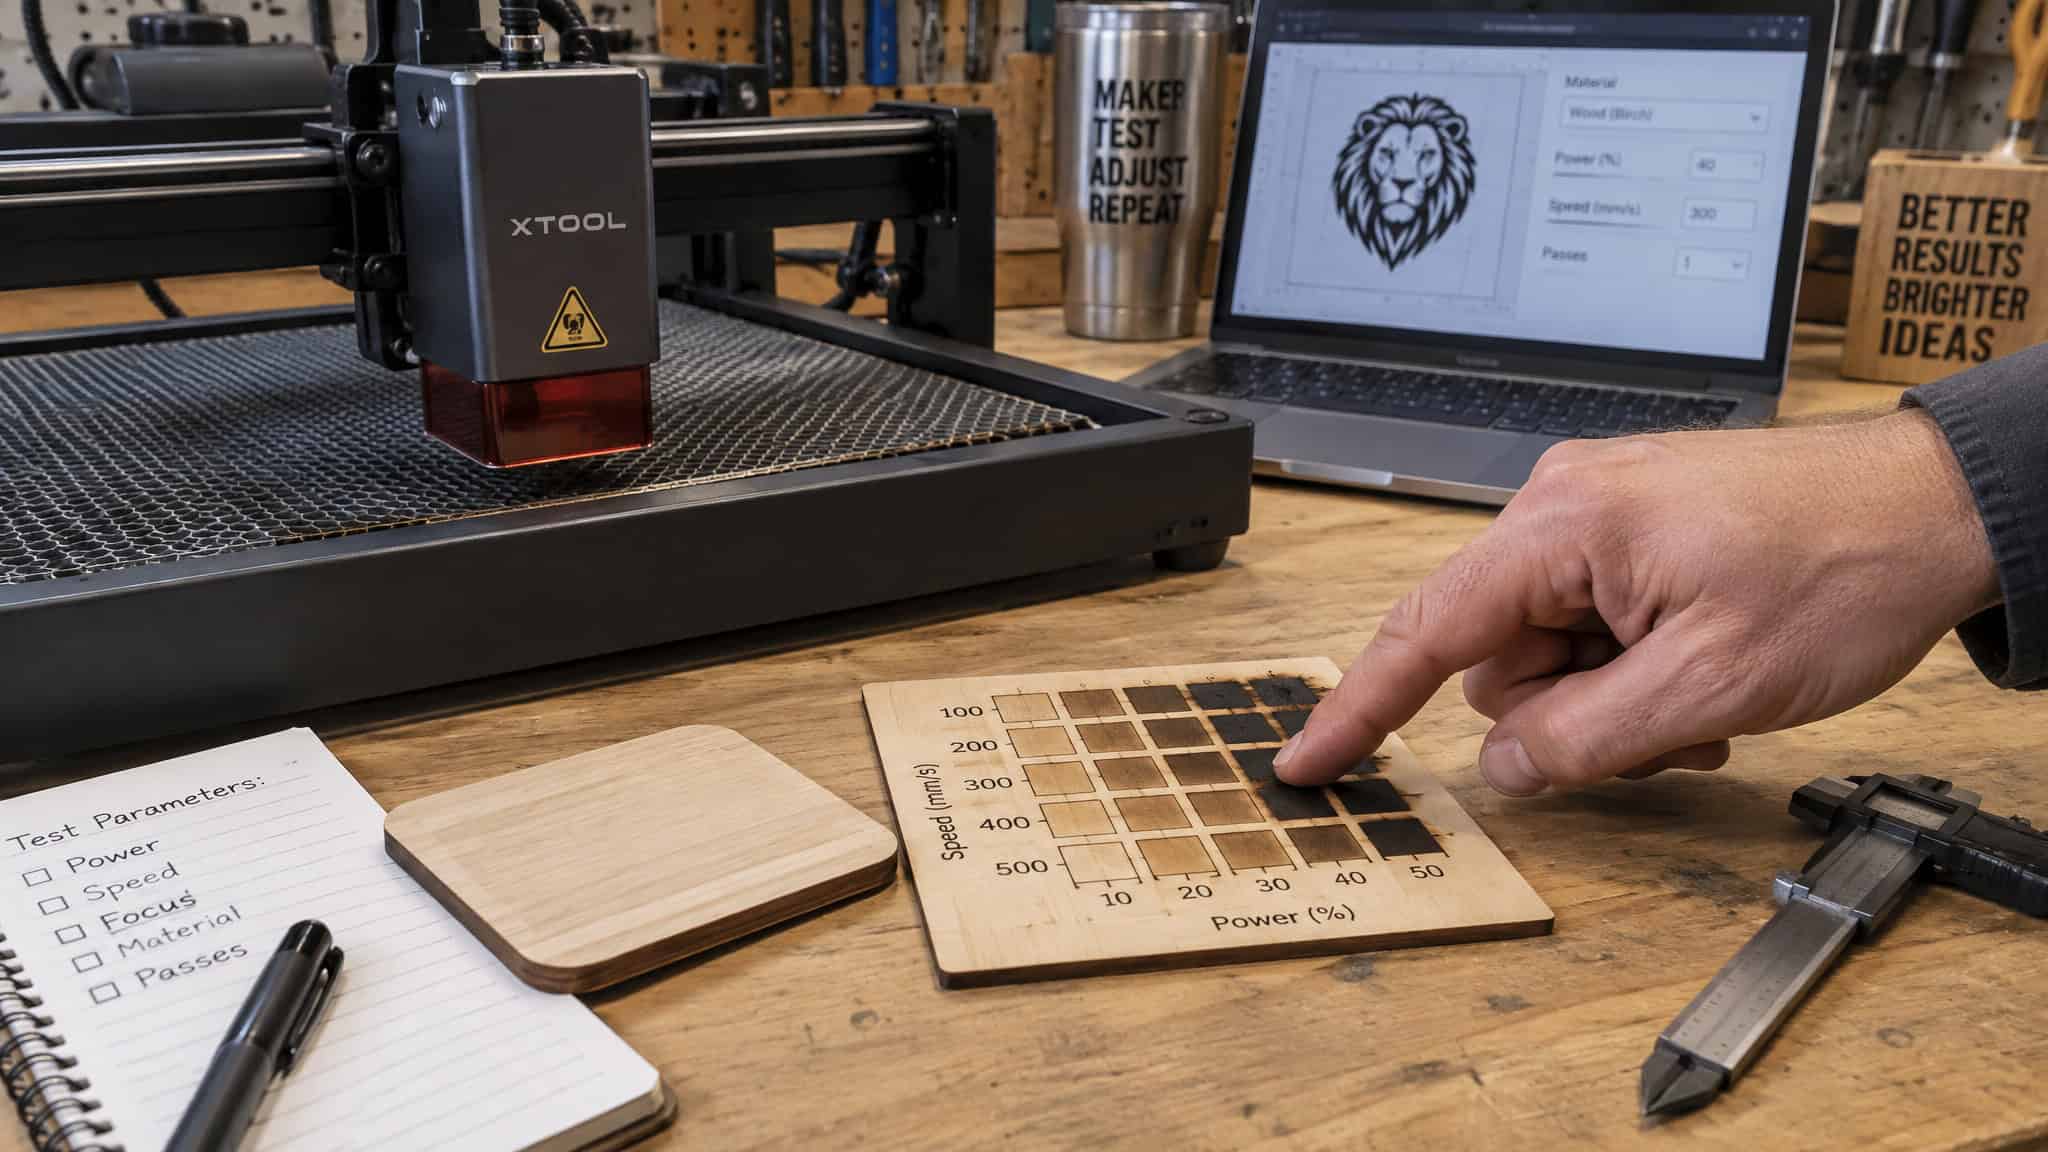
In the Magdeburg digital fabrication curriculum, material prep, power adjustment, and tolerance verification are practiced as a single pre-flight routine. Before firing at full power, run your machine’s frame trace mode, sweeping a low-power diode beam or red dot pointer around the design’s outer bounding box, to confirm the graphic sits dead-center on the coaster blank.
If a test burn comes out scorched, hatched over negative space, or missing text, walk backward through the four file-stage culprits:
- Missing lettering or broken arcs: Live text or an Envelope Distort warp wasn’t converted to shapes via
Object > Expand. - Filled-in backgrounds or inverted seals: White fills were left inside the expanded trace instead of being stripped out with
Select Same > Fill Color. - Scorched corners or double-burned lines: Overlapping post-trace geometry wasn’t merged with the Shape Builder tool, or ungrouped paths shifted on import.
- Refused imports or garbled curves: The file was saved as a modern CS5/CS6
.aidocument instead of legacy Illustrator 8, EPS, or DXF, or the Photoshop Threshold slider was pushed past the ~184 sweet spot and washed out the source art.
From school workshop to home desk
Running this end-to-end coaster pipeline at home puts the exact digital fabrication workflow taught at Magdeburg’s IGS Regine Hildebrandt center, where students moved from analog overhead projectors to running clean vector files and real cutting parameters on a compact Makeblock laser engraver alongside 3D plotters and digital embroidery machines, onto your own desk. Once every file passes through a 600 dpi Photoshop Threshold rescue, Object > Expand path and text conversion, white-fill deletion, Illustrator 8 or DXF export, caliper focus verification on safe substrates, and a scrap test burn, custom coasters stop being guesswork and become repeatable fabrication.
Frequently Asked Questions
What materials work best for laser engraved coasters, like wood, bamboo, or acrylic?
Wood, plywood, bamboo, leather, glass, natural slate, and laser-safe acrylic all make great coasters, though glass and stone are strictly for surface etching rather than cutting. If you use slate, scrub it clean first, skip ultra-fine filigree that disappears into the flaky layers, and measure each piece with a digital caliper since natural stone thickness varies. Never put polycarbonate under the beam—unlike acrylic, it melts into a ruined mess and vents toxic gases.
What power and speed settings should I use to engrave wooden coasters?
There is no universal numeric recipe for wood or stone because natural grain density varies so wildly that even two passes at the exact same settings can burn differently. While a 5W–10W diode laser on slate might start around 3000 mm/min at 85% power and a 40W+ CO2 unit runs much faster, you always have to pull baseline settings for your specific laser module and burn a sacrificial test grid on a scrap blank first. Before firing at full power, run the machine’s low-power frame trace mode to verify the graphic sits dead-center.
Is a small diode laser engraver good enough for coasters or do I need a CO2 laser?
A compact diode engraver is actually better for intricate coaster faces because surface detail relies on a tight optical spot size rather than raw cutting wattage. An Atomstack Pro with a 0.009-inch focus or a 6 oz, 1.6W Laserpecker Mini can render finer detail on a 4-inch coaster than a 40W+ CO2 laser running at 25 times the power. You only need a big cabinet machine like the OMTech 60W CO2 if you want to run large multi-coaster batches or slice through plywood and acrylic blanks up to 1.4 inches thick.
